Automated backup offers a convenient way to have complete backups of your VPS available from the OVHcloud Control Panel without having to configure them in the server. Additionally, this feature allows you to mount a backup and access it via SSH. In this article, we will cover how to use automated backups for your VPS.
Topics
Subscribing to Automated Backups
Log into the OVHcloud Control Panel and select your VPS from the left-hand sidebar. Then click the Automated backups tab. Click Enable Automated backup.

Take note of the pricing and then click the Order button. You will be guided through the ordering process, receiving a confirmation email upon completion. Backups will now automatically be created daily as long as you keep this option enabled.
Restoring a Backup from the OVHcloud Control Panel
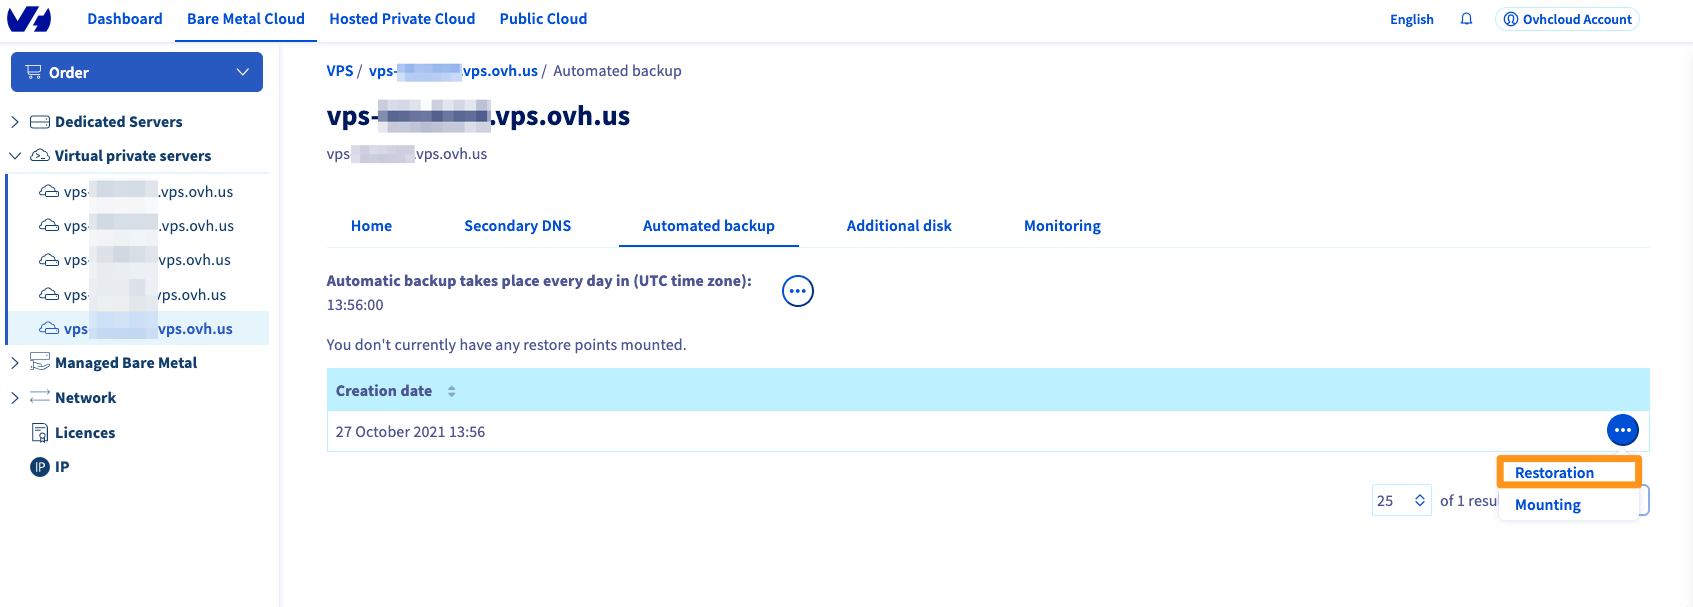
After selecting your VPS, click the Automated backups tab. There will be a maximum of seven daily backups available. Click ... next to the backup you want to restore and select Restoration.

Unless there is a good reason not to, make sure to tick the option "Modify the root password on restoration" in the pop-up window to preserve your current root password and click Confirm. You will receive an email as soon as the task is complete. Please allow some time for the restoration process to complete. Note that your VPS will not be available during the restoration process.
Warning: Please note that the automated backups will not include any additional disks you have.
Mounting and Accessing a Backup
If you want to access a backup without overwriting your current system, you can mount the backup and access it at the mount point instead.
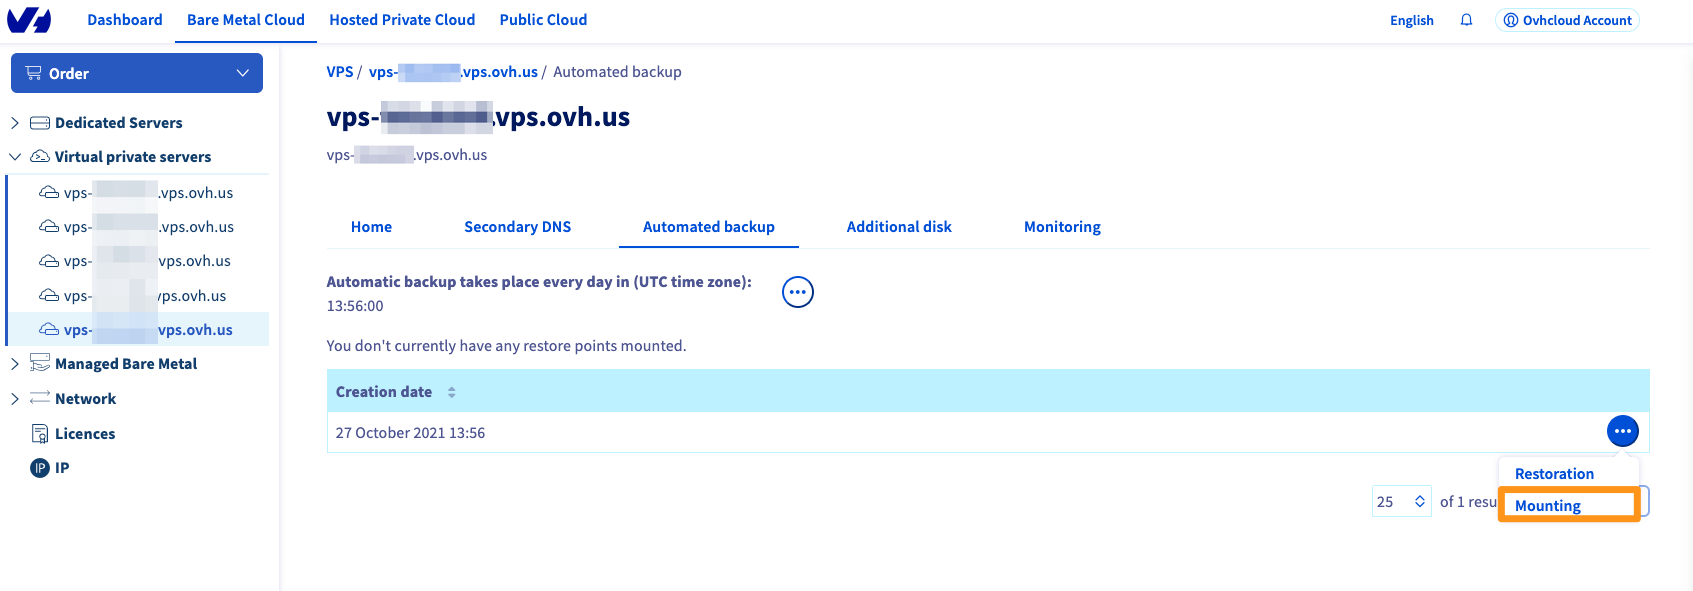
Click the ellipsis (...) next to the backup you wish to mount and select Mounting.

After the process has completed, you will receive an email. You can now connect to your VPS and add the partition where your backup is located. To do so, SSH into your VPS using the following command, replacing the username and IP with that of your VPS:
ssh root@203.0.113.1
You can use the following command to verify the name of the newly-attached device:
lsblk
Here is a sample output of this command:
NAME    MAJ:MIN RM  SIZE RO TYPE MOUNTPOINT
sda       8:0    0   25G  0 disk
├─sda1    8:1    0 24.9G  0 part /
├─sda14   8:14   0    4M  0 part
└─sda15   8:15   0  106M  0 part
sdb       8:16   0   25G  0 disk
├─sdb1    8:17   0 24.9G  0 part
├─sdb14   8:30   0    4M  0 part
└─sdb15   8:31   0  106M  0 part /boot/efi
sdc       8:32   0   50G  0 disk
In this example, the partition containing your backup filesystem is named sdb1. Now create a directory for this partition and define it as the mount point.
mkdir -p /mnt/restore
mount /dev/sdb1 /mnt/restore
You can now switch to this folder and access your backup data.
Best Practice for Using Automated Backups
The Automated Backup functionality is based on VPS snapshots. We recommend that you follow the steps below to prevent any issues before using this option.
Configuring the QEMU agent on a VPS
Snapshots are instantaneous images of your running system (“live snapshot”). To ensure the availability of your system when the snapshot is created, the QEMU agent is used to prepare the filesystem for the process.
The required qemu-guest-agent is not installed by default on most distributions. Moreover, licensing restrictions may prevent OVHcloud from including it in the available OS images. Therefore, it is best practice to verify and install the agent in case it is not activated on your VPS. Connect to your VPS via SSH and follow the instructions below, depending on your operating system.
Debian-based distributions (Debian, Ubuntu)
Use the following command to check whether the system is properly set up for snapshots:
file /dev/virtio-ports/org.qemu.guest_agent.0
/dev/virtio-ports/org.qemu.guest_agent.0: symbolic link to ../vport2p1
If the output is different (“No such file or directory”), install the latest package:
sudo apt-get update
sudo apt-get install qemu-guest-agent
Reboot the VPS:
Start the service to ensure it is running:
sudo service qemu-guest-agent start
Redhat-based distributions (Centos, Fedora)
Use the following command to check whether the system is properly set up for snapshots:
file /dev/virtio-ports/org.qemu.guest_agent.0
/dev/virtio-ports/org.qemu.guest_agent.0: symbolic link to ../vport2p1
If the output is different (“No such file or directory”), install and enable the agent:
sudo yum install qemu-guest-agent
sudo chkconfig qemu-guest-agent on
Reboot the VPS:
Start the agent and verify that it is running:
sudo service qemu-guest-agent start
sudo service qemu-guest-agent status
Windows
You can install virtio-win-guest-tools.exe via MSI file, available from the Fedora project website:
https://fedorapeople.org/groups/virt/virtio-win/direct-downloads/archive-virtio/virtio-win-0.1.208-1/
Verify that the service is running by using this powershell command:
 Get-Service QEMU-GA
Status   Name               DisplayName
------   ----               -----------
Running  QEMU-GA            QEMU Guest Agent
Conclusion
Having read this article, you should be able to manage your automated backups for your OVHcloud VPS.


